Saturday, December 10, 2016

Putting a phone on a guitar

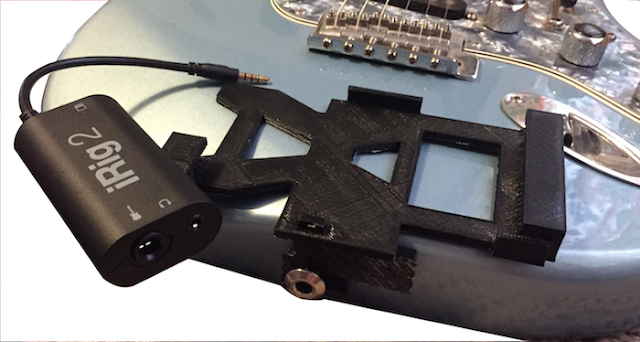
Today I have been prototyping a holder for the iPhone on my guitar.  I was playing around with LoopyHD (https://itunes.apple.com/us/app/loopy-hd/id467923185?mt=8) and was wanting to be able to have the controls close to me.  With this program I can make a rhythm loop and then practice playing some leads over that.

My design so far consists of two chunks of plastic that were 3D printed and snapped together.  The top portion holds the iPhone and the iRig2 together.  The second chunk holds the unit on using the locking strap button.  With dunlop strap locks, the strap is on the outside of the pin leaving a good area to attach more stuff.  I am currently printing a new bottom chunk to help control the unit from rotating from the weight of the iPhone.  I want this thing to be solid.  The final touch will be adding felt to all the sides that touch the guitar.
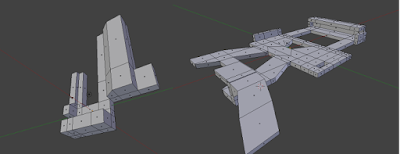


If you want to make one of these things for your guitar,  you can download the Blender and STL files.
https://drive.google.com/file/d/0Bw-316H4anXJOXFtbW9OSE5mMG8/view?usp=sharing.

You might need to modify the top portion to fit your phone.  This holder was designed for the iPhone 6 but it should work for the 6s and 7 models since they have similar dimensions.  The strap piece was designed for the Dunlop Straplock system http://www.jimdunlop.com/products/accessories/straplok.  It should work with other strap buttons and the blender files included can be modified all you want.
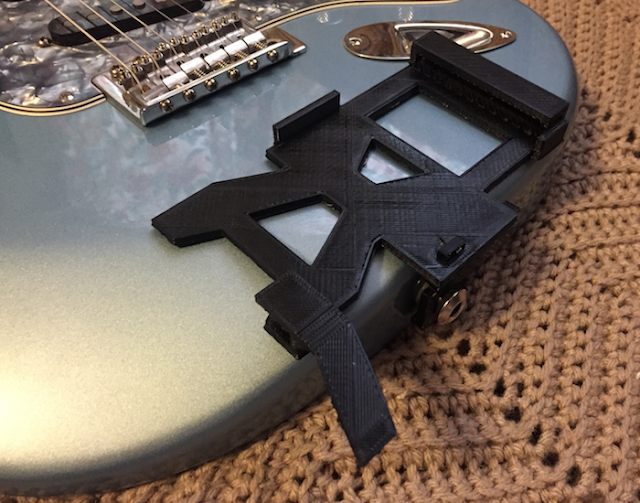


Some final notes.  This was printed with rafting which adds some width to the piece if you do not get it all pealed off.  The portion that connects the two pieces takes that into account.  If you are not printing with rafting or if you are awesome at getting that layer off, then you will need to adjust the model to have either a bigger nub or a smaller hole.

Happy printing and Keep on Rock'n,
Jeremy Skrdlant


Thursday, March 31, 2016

Exciting Project Scheduled for tomorrow

Our students this Friday will be building a life size death star for a client.  It will be fully functional with lasers, massive size, and great tunes.


So students, on Friday make sure you bring your soldering irons, claw hammers, and ambition as we take on this monumental task.  The client has wanted this project done since the mid 80s so we will have to deliver in a day to keep them happy.

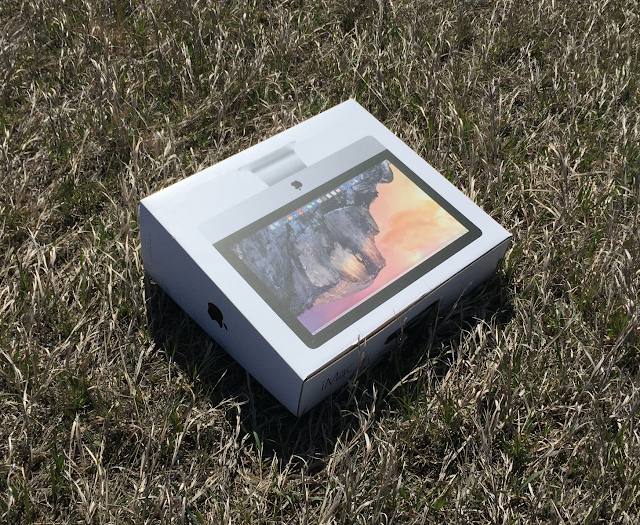
Our launch pad is located just south of our building in the field shown below.


There should be enough space for this 165 kilometer sphere since everyone knows that spheres come to a point at the bottom.  The launchpad itself will be placed in what looks to be the center of the field.  For most of this project, we will be eyeballing the measurements.  There is no time for tape measures with this build!

We are also thinking green by making the launchpad out of an old iMac box.  We might need to reinforce it but we will tackle that problem when we get to it.


Look to the south throughout the day to see our progress on this massive wonder.

Jeremy Skrdlant

Saturday, December 12, 2015

Near future of cooking and the Internet of things

This writing is not fully researched and is more of a thought experiment.  It comes from items I have read and great people I have talked to.  I just thought to myself what cooking in the future would be like and wrote it down.  Enjoy. 

All great meals start with the toilette


This is the first place of collecting data on your health in the modern home.  There are companies working on building toilettes that can analyze your health and let you know when it’s time to see the doctor.   For our scenario we will assume that the loyal commode will keep track of essential vitamins and nutrients for you.   We will also assume many other devices in the home like your bed and fitness trackers will give us a clearer picture on your overall health.  Your TV could even end up ratting you out for binge watching that favorite show.  Shame on you, you should have been exercising.

The fast way of food consumption


You pull up to a line of cars at your favorite fast food restaurant.  With your handy app you begin to build your order on your phone.  You pull up to what used to be the order speaker and simply scan your phone to submit y our order along with your nutrients requirements your app got from your home.   The restaurant builds your burger fully injected with a cocktail specifically mixed for you.  This cocktail contains flavorless vitamins and nutrients that were prescribed by your toilette.  It feels like you are eating the standard fast food but it is chemically superior. 

The “I have time to make stuff method”


You are at the store and you have a recipe that was recommended by your wearable devices.  You might have requested fried butter but it found something similar with the nutrients you need.  Your smart home has the desire of keeping you healthy.  The first step is seeing what ingredients you already have.  Your wearable device will link back to your home and ask the fridge and cabinets what items you already have off the list.  Both of these home devices can use RFID technology to scan its contents and report back the status.  For example, you might have milk but it has been in there for about a month.  Armed with this information you can purchase only what you need and return home to begin cooking.

Most recipes have you start by preheating the oven.  You will not have to worry about that in the future.  You will start to prep the meal by chopping and mixing ingredients.   Your wearable devices will guide you through the process keeping track of what step you are on.  Once the device recognized the time it will take you to finish prepping the ingredients is equal to the time it takes for your oven to warm up, it will send a signal to the oven letting it preheat to the temperature in the recipe.  Once you open the door and put your masterpiece in the oven, the door closing will start a timer automatically from the recipe.  Sensors in the oven will ensure that your food doesn’t burn and that your dish comes out perfectly.   You will be instructed when to start making the side dishes at exactly the right time so that everything is served to the table fresh and hot.  

Bon Apétite 

Sunday, November 8, 2015

Arduino Sensors in Unity by using Node.js with Express.js


For this weekend hack,  we are building a 3D game with custom control input from an Arduino board.  Watch the video and use the code below to build it for yourself.

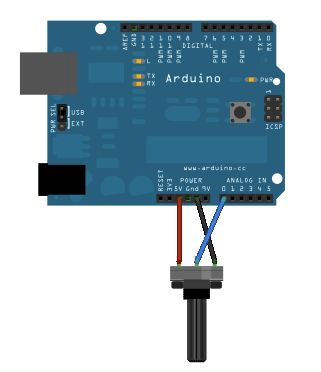
Arduino Wiring
Arduino Code
void setup()
{
    Serial.begin(9600);
}

void loop()
{
    int amount = analogRead(0);
    Serial.println(amount);
    delay(30);
}

Node Libraries
Express - We use this for routing the web page to listen to a port. We could change this so that the user could pass in different routes to get multiple potentiometer values. 

SerialPort - This is a library used to read in the serial port data so node can parse it and put it on the web. 

Node Server Code
var express = require("express");
var app = express();
var serialPort = require("serialport");
var SerialPort = serialPort.SerialPort;
var currentSetting = 0;

 var sp =  new SerialPort("serial_port",{
    baudrate:9600,
    parser:serialPort.parsers.readline("\n")
 });

sp.on('open',function(){
    sp.on('data',function(data){
        console.log(data);
        currentSetting = data;
    });
});

app.get("/",function(request, response){
    response.send(currentSetting);
})

app.listen(portNumber);

Unity Code (javascript)
#pragma strict
private var locked = false;
private var currentSpeed = 0;

function Start () {
}

function Update () {
    transform.Translate(Vector3.left * Time.deltaTime * currentSpeed * -1);
    if (!locked)
    {
        locked = true;
        AcceleratorInput();
    }
}

function AcceleratorInput(){
    var www = WWW("http://127.0.0.1:10800/");
    yield www;
    currentSpeed = (parseFloat(www.text)/1024) * 50;
    locked = false;
}


That is all.  I hope you enjoyed this weekend hack!

Jeremy Skrdlant

Monday, June 1, 2015

Private Git for teams up to 5

I just started using a nice version control tool called BitBucket (https://bitbucket.org/).    It is free if your team is less than 5 members and you get unlimited private repositories.  It is similar to GitHub except that GitHub's free plan only works with open-source projects that are available to the public.  If you have a secret project that is going to make you millions, you might not want to put it there if a clone of your code could destroy you :)  Then again your code could save humanity and you could still end up making some good money off of it. 

Version control systems allow teams to work on the same peace of code.  They go through a process of committing, pushing, and pulling the code down to their local computers.

A normal workflow
  • Pull latest version of the software to your machine.
  • Add your features to the code
  • Test your features and ensure it doesn't break the entire system.
  • Commit your changes commenting on what you did
  • Push your changes back up to the server
There are many nice features like going back in time and having the entire development staff on the same version of code. And if you are lucky you will not have any of the dreaded conflicts where you change the same piece of code that another developer changed.  In that instance the machine gives up and asks you what should be included and what should be scrapped. 

I think that BitBucket is great for those small projects were you want to keep your code a secret.  But if you want to get noticed by employers, GitHub is definately the way to go.  The strongest way to build a portfolio is to have your projects out and visible to the public.


Link for generating a SSH Key
https://help.github.com/articles/generating-ssh-keys/ 

Happy Coding!
Jeremy Skrdlant

Thursday, August 8, 2013

Countdown to Class Beginning

Class will begin shortly so to get back in the game I created a countdown to one minute before class officially begins.  You can view the countdown at the following location.

http://www.nwktc.edu/maed/appdevcountdown.html

There are a couple of things to note about the countdown.
  • It is set to general mountain time so the -0600 Time Stamp
  • The font automatically changes size to the width of the window
  • It detects when the day occurs and changes from until class starts to Since Class Began.
Here is the Javascript for the page.  The page itself has only 1 div that has an id of label. 

<script>
    //This is the date we are counting down to.
    var dateClassStarts = new Date("August 12, 2013 7:59:00 -0600");
   
    $(document).ready(function(){
        //Write out the original Difference in time.
        writeOutTime();
       
        //Size the font to the window.
        resizeFontToWindow();
       
        //Update the timer every second.
        setInterval(writeOutTime,1000);
    });
   
    //If the window resizes, we want the font to change.
    $(window).resize(function(){
       resizeFontToWindow();
    });
   
    function writeOutTime(){
        //Get new Time
        var currentTime = new Date();
        //Calculate the entire difference in milliseconds.
        var difference = dateClassStarts - currentTime;
       
        //Determine if the class is in the future or the past.
        var classHasStarted = false;
        if (difference < 0) {
            classHasStarted = true;
        }
       
        //Take the absolute value so you always have positive values. 
        difference = Math.abs(difference);
       
        //86400000 is 1000 * 60 * 60 * 24
        //Calculate the Days, Hours, Minutes, and Seconds.
        //Note the use of the floor so it ignores the remainder.

        var days = Math.floor(difference/86400000);
        difference -= days * 86400000;
        var hours = pad(Math.floor(difference/ 3600000),2);
        difference -= hours * 3600000;
        var minutes = pad(Math.floor(difference / 60000),2);
        difference -= minutes * 60000;
        var seconds = pad(Math.floor(difference / 1000),2);
       
        //Put the String together.
        var dataString = days + " Days<br> " + hours + ":" + minutes + ":" + seconds + "<br >";
       
        //Add to the string if the class has begun or not.
        if (classHasStarted) {
            dataString += "Since Class Began";
        }else{
            dataString += "Until Class Starts";
        }
       
        //update your label
        $("#label").html(dataString);
    }
   
    function resizeFontToWindow()
    {
        //Get the Width of the Div that holds the label
        var widthOfLabelDiv = $("#label").width();
        //Calculate a new font size based off that width
        var newFontSize = widthOfLabelDiv / 9;
        //Animate to that new size in 100 milliseconds
        $("#label").animate({
            fontSize: newFontSize + "px"
        },100);
       
    }
   
   
    //Changes the numbers so that they are 05 instead of 5 when you have a size of 2.
    function pad(num, size) {
        var s = num+"";
        while (s.length < size) s = "0" + s;
        return s;
    }
</script>

Sunday, December 2, 2012

Custom Fonts in an iOS App


UPDATE --  Swift 3 and Xcode make it easier than ever to add custom fonts to an iOS App. Below is the updated video for this.  Below is the original post with all the extra steps. 


ORIGINAL POST -------
In this post we are going to explore the world of custom fonts and iOS.  Now there are plenty of fonts built in but there might come a time where you know of an OTF or TTF file that has the exact font you want and is not in the choices in Xcode.  

Step 1: Find Your Font
For this app you can use any otf or ttf type file.  A few options are Font Squirrel or Smashing Magazine.  You can also use any other free fonts that a Google search turns up or you could build your own.   

Step 2: Add it to Your Xcode Project


Step 2: Use the following code snippet to find the font name.


Code Snippet
for(NSString *family in [UIFont familyNames]){
        for(NSString *font in [UIFont fontNamesForFamilyName:family]){
            if([[font lowercaseString] hasPrefix:@"w"])
            {
                printf( "Font: %s \n", [font UTF8String] );
            }
        }
    }


Step 3: Apply the Font to your Label


As Always Happy Coding
Jeremy Skrdlant